So it was a rainy Sunday at the end of the summer and I was bored. The house was finished the bike was serviced and even the boat I built last year was a distant memory. Clearly the world needed a new guitar.
Not sure why I chose a guitar, perhaps the fact that I like to play the guitar (badly) had some bearing but I think the main thing was the challenge. Its not the sort of thing you are supposed to be able to make in your garage. When I told people about it they generally raised their eyebrows in a sort of a ‘really? Like that’s going to happen’ sort of a way. Comments like “Well it’s about the journey, not whether you manage it”, just spurred me on even more. My Wife, let’s call her N. on the other hand was more practical and shook her head in a ‘how much mess is that going to make?’ way.
Still, undaunted by the non believers I set out to find out where to start. After trawling amazon for about a week I found a book by Jonathan Kinkead who builds guitars for a living down in Bristol. You can find it here. The book turned out to be fantastic. A step by step guide with lots of pictures and illustrations. A whole section on what tools and jigs are needed and even a bit about how to sharpen your chisels properly (who knew?). In fact the actual guitar building doesn’t start till half way through the book!
And so to work… the first step is to build a mould for the guitar. This forms a secure shell into which you place the bits of wood for the sides. It sort of holds them in place whilst you attach the top and bottom. The first step was to make a perspex cut out of half the guitar shape. This is pretty easy as the perspex is see-through so you simply pop it over the plan (supplied with the book) and copy the outline with a marker pen. Then its a simple cut out job with a bandsaw…..only I didn’t have a bandsaw so I used a fretsaw which took about a century. The picture below show the rough cut which needed sanding down to the line.
This took a lot longer than I thought. Perspex is tougher than you think and will insist on melting if you sand with too much vigour.
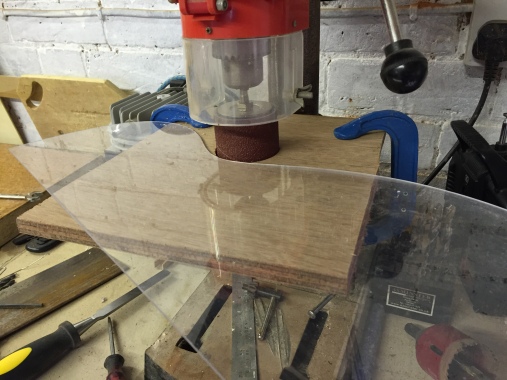
Sanding the inner curves was a bit more challenging and what I clearly needed was a bobbin sander….but they are like more than $100 (that’s pounds but I can’t find the pound sign on this Mac). So a quick visit to my local Screwfix set me up with a set of sanding drums that fit onto a pillar drill. These are great so long as you don’t press on too hard and bugger up the bearings on your drill. Below is a picture of it in use. I had to make a wooden table to clamp onto the drill so that the drum didn’t try and sand away the drill stand. Note how the drum pokes through a hole but doesn’t touch the sides.

The next step is to build the mould using the template as a …template. The mould is built from 18mm plywood. I drew the outline then cut out 4 bits of wood in the right shape. Again it has to be sanded down to an accurate line following cutting out with a jigsaw (I’d given up with the fretsaw because I wanted to finish the job before I reached 90. Once more the drum sanders on the drill were invaluable and pretty soon I had the 4 bits of plywood cut into the right shape.
And here they are. Each pair of sides joins together with a set of short softwood lengths glued in place to hold the 2 sections apart (about the same width as a guitar oddly enough).
At each end I added some chunks of 18mm ply to act as clamps so that the two finished halves could be screwed together.
So here are the moulds. The bottom one nearly finished and the top one just started. After glueing the softwood chunks in place I had to resort back to the drum sanders, chisels and sanding blocks to trim the blocks down to match the templates top and bottom. The picture shows the clamping blocks at the ends.
And so, after a few weeks work I hadn’t even started the guitar. I simply had a huge heavy ‘thing’ in the shape of a guitar. The rest of the build it turned out was going to be similar to this with almost as much time spent on building jigs and moulds than actually making the guitar. Still, its money in the bank for the second guitar :).
Next time I’ll take the next step and look at putting the sound board together……

Leave a comment