Building the guitar

So it was a rainy Sunday at the end of the summer and I was bored. The house was finished the bike was serviced and even the boat I built last year was a distant memory. Clearly the world needed a new guitar.

Not sure why I chose a guitar, perhaps the fact that I like to play the guitar (badly) had some bearing but I think the main thing was the challenge. Its not the sort of thing you are supposed to be able to make in your garage. When I told people about it they generally raised their eyebrows in a sort of a ‘really? Like that’s going to happen’ sort of a way. Comments like “Well it’s about the journey, not whether you manage it”, just spurred me on even more. My Wife, let’s call her N. on the other hand was more practical and shook her head in a ‘how much mess is that going to make?’ way.

Still, undaunted by the non believers I set out to find out where to start. After trawling amazon for about a week I found a book by Jonathan Kinkead who builds guitars for a living down in Bristol. You can find it here. The book turned out to be fantastic. A step by step guide with lots of pictures and illustrations. A whole section on what tools and jigs are needed and even a bit about how to sharpen your chisels properly (who knew?). In fact the actual guitar building doesn’t start till half way through the book!

And so to work… the first step is to build a mould for the guitar. This forms a secure shell into which you place the bits of wood for the sides. It sort of holds them in place whilst you attach the top and bottom. The first step was to make a perspex cut out of half the guitar shape. This is pretty easy as the perspex is see-through so you simply pop it over the plan (supplied with the book) and copy the outline with a marker pen. Then its a simple cut out job with a bandsaw…..only I didn’t have a bandsaw so I used a fretsaw which took about a century. The picture below show the rough cut which needed sanding down to the line.IMG_1443

This took a lot longer than I thought. Perspex is tougher than you think and will insist on melting if you sand with too much vigour.

Sanding the inner curves was a bit more challenging and what I clearly needed was a bobbin sander….but they are like more than $100 (that’s pounds but I can’t find the pound sign on this Mac). So a quick visit to my local Screwfix set me up with a set of sanding drums that fit onto a pillar drill. These are great so long as you don’t press on too hard and bugger up the bearings on your drill. Below is a picture of it in use. I had to make a wooden table to clamp onto the drill so that the drum didn’t try and sand away the drill stand. Note how the drum pokes through a hole but doesn’t touch the sides.

IMG_1442

The next step is to build the mould using the template as a …template. The mould is built from 18mm plywood. I drew the outline then cut out 4 bits of wood in the right shape. Again it has to be sanded down to an accurate line following cutting out with a jigsaw (I’d given up with the fretsaw because I wanted to finish the job before I reached 90. Once more the drum sanders on the drill were invaluable and pretty soon I had the 4 bits of plywood cut into the right shape.IMG_1448

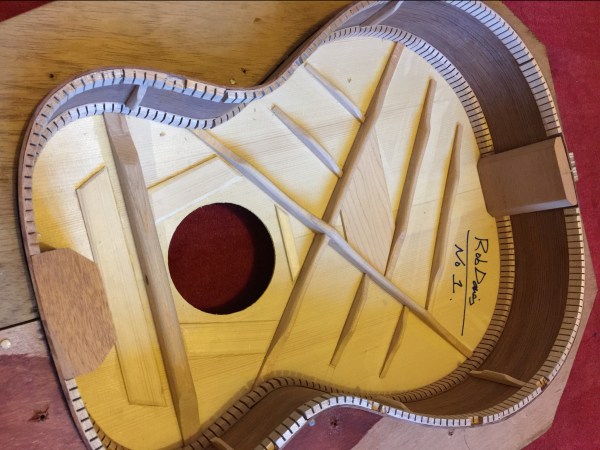
And here they are. Each pair of sides joins together with a set of short softwood lengths glued in place to hold the 2 sections apart (about the same width as a guitar oddly enough).

At each end I added some chunks of 18mm ply to act as clamps so that the two finished halves could be screwed together.IMG_1451

So here are the moulds. The bottom one nearly finished and the top one just started. After glueing the softwood chunks in place I had to resort back to the drum sanders, chisels and sanding blocks to trim the blocks down to match the templates top and bottom. The picture shows the clamping blocks at the ends.

And so, after a few weeks work I hadn’t even started the guitar.  I simply had a huge heavy  ‘thing’ in the shape of a guitar. The rest of the build it turned out was going to be similar to this with almost as much time spent on building jigs and moulds than actually making the guitar. Still, its money in the bank for the second guitar :).

Next time I’ll take the next step and look at putting the sound board together……


Slow but Swift

Swift is the language of choice for the iPhone app. That is to say the only choice, and like everything else to do with apple it’s incompatible with almost everything else. You can’t swap your finished app over to google play or anything sensible like that. no.

The journey starts with an install of the XCODE tool. Its fairly good and not too difficult to use. On the surface its a drag and drop environment so you can build up whatever you want on the screen and make it look pretty, but here’s the rub. Not all iPhones are created equal. They have taken a variety of different sizes and shapes over the years from tiny iPhone 4s up to the latest iPad and any app has to be viewable on ALL these platforms. Your pretty picture soon falls apart when stretched around to suit a different device.

Screenshot 2018-12-07 at 10.27.56

The layout issues are dealt with via constraints. So rather than saying that a picture is yay big and sits 100 pixels from the edge you say something like ..set the gap at the side of the screen to some value and let the picture auto fill in the space that’s left. Sounds simple but can lead to some rather odd results when you check it out on some other devices.

As you can see in the picture above XCODE lets you have a lot of different screens with ‘segues’ in between to travel amongst them (that’s the thin white arrows in the screenshot). Each one is a different screen for the user. In this way you can set up a whole set of different user experiences, each bringing something new to the app. Unfortunately I really only needed one screen, a lightsaber. However, in the interests of consumerism and ‘more is better’ I added a welcome screen with buttons.

fullsizeoutput_259      fullsizeoutput_25a

As you can see it has basically one button which is ‘Start’. So having looked at it I thought perhaps I should add some more buttons to make it look a bit more professional. Of course the main issue (as I was to find out) was that the app was not really professional in the first place. Ignoring that fact I added a couple of greyed out buttons for options (god know what options) and ‘Customise’ (yes I know, customise what?). It didn’t matter because they were greyed out. Extra content to be purchased later using the final button ‘remove ads’ (yes the ads are those little banners at the bottom of the screen that I now know nobody bothers to pay to remove). I set it up so that if you clicked a grey button then a little window popped up and said ‘you have to upgrade to use this function’.

The other screen was the main one, the lightsaber. Something I drew up in 5 mins on a free drawing app. A quick cylinder with some shading and some rings on it. Cool, right? Well, no. In fact pretty rubbish. Not only did it not look the part but it didn’t even stay the same shape when viewed on iPads.

Still, ignoring all these issues I optimistically submitted it to the apple store in the expectation that they would accept it.

Of course they didn’t. The reason was that it had buttons that didn’t work (who knew?) and thus did not give the user a good experience.

It meant I was going to have to go back to the drawing board. A quick hack at some code with some rough old pictures wasn’t going to cut it. I was going to have to write a proper app with content and a decent user interface.


Phone Sabre


The first App

So I was watching L. playing around with a toy lightsaber. She was swishing it about and making the noises (much as Ewan McGregor was apparently asked to stop doing during filming). I thought that it might be nice to make a phone app that did the noises for you. How hard can it be?

It was my first foray into iPhone apps so I wasn’t sure I was actually going to get it to work. Lots of things to think about (and lots I hadn’t thought of). First was to get the accelerometers in the device working, then to be able to play a sound on command, to vary the pitch, speed and volume of the sound depending on the ferocity of the swish and finally to put together some sort of graphic to look a bit like a lightsaber.

It’s all done with a program called Xcode. Its the development environment created by apple that lets you write code, design interfaces and even submit apps to the App Store (once you have handed over your $80 a year that is). I have to say, its not bad. You drag and drop objects onto the screen and build your interface graphically. Then you simply (simply?) link blocks of code to the various buttons and images and away you go. The only snag is that XCODE only runs on a Mac.( well you can get it to run on a PC but its not easy). Thusly the next step was to buy one and they are far from cheap….even second hand from eBay (which is where this one came from). The thing about Macs is that they are twice as good as a normal laptop but 3 times the price. Go figure. So that’s a total investment now of like $800. This app better make some money or I’m going to be seriously out of pocket (STOP PRESS: as of today the app has made 26p in three weeks, and that’s before tax! its going to take a while to recoup the losses)

The development language is called ‘SWIFT’ presumably because it isn’t (well, not when you first try to get started it’s not). I tried a great web intro from a site called Code with Chris, which turned out to be really quite good. It explains how to get started on the road with a simple card game.

The next step came whilst I was away at a conference. I had my laptop with me and a few hours to spare so I spent it gainfully searching the web for royalty free lightsaber sounds. I can only imagine what the people in the next room thought was going on 🙂

So there it was. The sounds ready, the language tried out. All that’s left is to start writing….


Sharing the projects

For as long as I remember Ive built things. I can’t explain why but theres always been a spark at the back of my mind that pushes me to create. This strange desire has manifested itself in many forms over the years, initially with models but then as I grew older it morphed into DIY. We bought a run down old house and did it up, mostly by trial and error (lots of error) but also by following the good old Reader’s Digest big red book.

As the years moved on we fixed up more houses and even if I say so myself, got fairly good at it. Of course when the house is finished the old need to create something else always reappears and this is where the construction of musical instruments, sailing boats (yes real ones) and all other manner of odd things has emerged.

This site then is my attempt to share some of my projects with the hope of encouraging others to have a go at some of them. Hopefully I will give enough details that the basic ideas can be followed almost as a set of instructions.

The site is also a front page for my Apps of course. You will find a support page for the apps that will allow you to get in touch to complain or praise the apps and maybe even persuade me to add functionality that you would like 🙂


IMG_0330

Blog at WordPress.com.

Up ↑